Company Document Upload or Deletion

Upload Company Document
Upload a File or Add a Folder
Pre-condition: A folder needs to exist before a file can be uploaded. To be able to add a folder or upload a document file, you need to be authorized to manage documents.
- Open the Company Documents screen.
- To open the "Upload Company Document" tool, click on the "New Document>>" hyperlink.
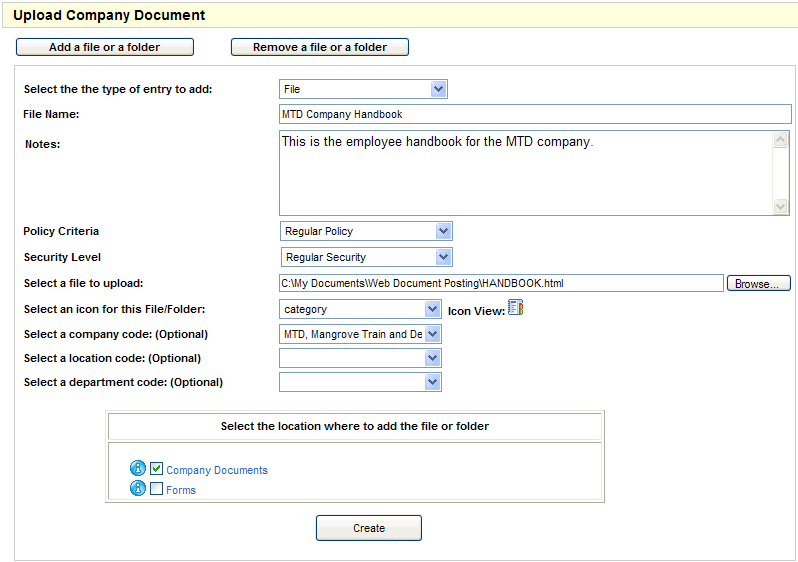
- Type and select the entries.
- Select the type of entry to add (required). For a document, select File. To add a folder, select Folder.
- File Name (required). Type the Name. The name entered replaces the file name of the uploaded file and is seen when a file is downloaded. Underscores replace spaces. Other special characters are unsupported.
- Notes. Optionally, type in notes. Later, on the Company Documents screen, the notes display as a tool tip when a user hovers the cursor over the folder or file.
- Policy Criteria. Optionally, select the policy criteria, such as Regular Security. The policy criteria is reserved for future functionality.
- Security Level. Optionally, select the security level, such as Regular Security. The security level is reserved for future functionality.
- Select a file to upload. Browse for and select a file to upload. Supported file types are GIF, HTML, JPEG, PDF, Microsoft® Excel®, Microsoft® Word®, and text.
- Select an icon for this File/Folder. The default icon for a document is "docs." Optionally, choose a different icon to display next to the file or folder on the Company Documents screen. Refer to the topic, Company Document Icons in the help system, for a list of available icons.
- Select a company code: (Optional). Optionally, restrict access to this document to only the selected company.
- Select a location code: (Optional). Optionally, restrict access to this document to only the selected location.
- Select a department code: (Optional). Optionally, restrict access to this document to only the selected department.
- Select the location where to add the file or folder. To choose the location (a folder), select the checkbox for a folder.
- Create. Click on Create.
Result: The screen refreshes, and you can repeat the process to add another file or folder.
- Navigate to another screen or return to company documents through the menu.
The file or folder becomes available to all employees with Employee self-service access when no company department, or location, was selected. When the file was uploaded or the folder was created for a particular company, location, and/or department, then only those employees with those assignments can access the file or folder.
If you are assigned to the company, department, and location selected (if any) for the document that you uploaded, then you can confirm that the document is available and displays as desired. Click on the document to open it. If changes are needed, delete the file, and upload a new document.
If you add a file or folder for a company in your system, department, or location, that you don't belong to, then you are unable to view or delete it.
Delete a File or Folder
You are only able to delete a posted document if you have access based on the uploaded document's filters for company, location, and department.

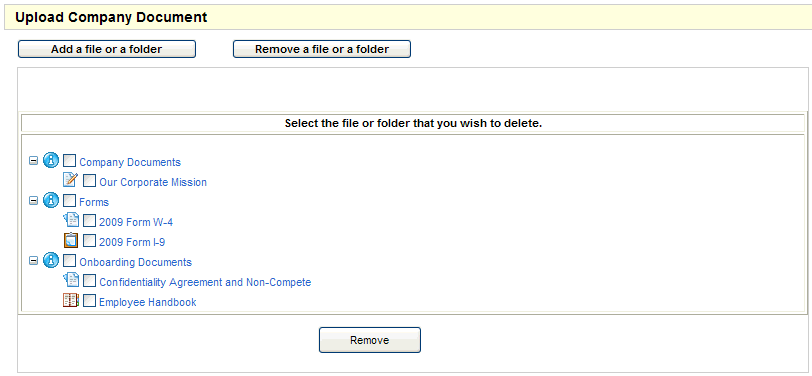
Screen to Delete a File or Folder in Company Documents
Pre-condition: A user needs to be authorized to manage documents to be able to delete a file or folder. When these items were added for a particular company, location, or department, you also needs to be assigned to that company, location, and department to be able to view and delete a particular file or folder.
- Open the Company Documents screen.
- To open the "Upload Company Document" tool, click on the "New Document>>" hyperlink.
- Remove a file or folder. Click on the button to "Remove a file or folder."
- Select the checkbox for the file or folder that you want to delete.
CAUTION: Removing a folder also deletes the contents of that folder.
- Remove. Click on Remove.
- Return to company documents, and confirm that the folder or file has been removed.